
Description
The afrus widgets allow actions to be carried out by users of interest to the organizations, consequently it is necessary to carry out a precise process of tracking what these users execute.
One of the most used tools for this purpose is Google Tag Manager, so within the Widget system it is intended to incorporate by default the possibility of integrating only the Google Tag Manager container ID (from now on we will call it GTM). The form will automatically begin to track and send the information to this platform for subsequent processing and specific use by the organizations.
Integration version
The new Afrus Widgets module allows you to track the actions of users of organizations through integration with Google Tag Manager. You only need to copy the GTM ID in the Global Settings > Advanced > Google Tag Manager section. This tracking code will make it easier to track and send information for further processing.
This code has the following structure: GTM-XXXX
In this sense, in afrus the container Id must be requested for each Widget and this must travel through the backend in the /form endpoint in order to be used by the Widget after its rendering.
Events
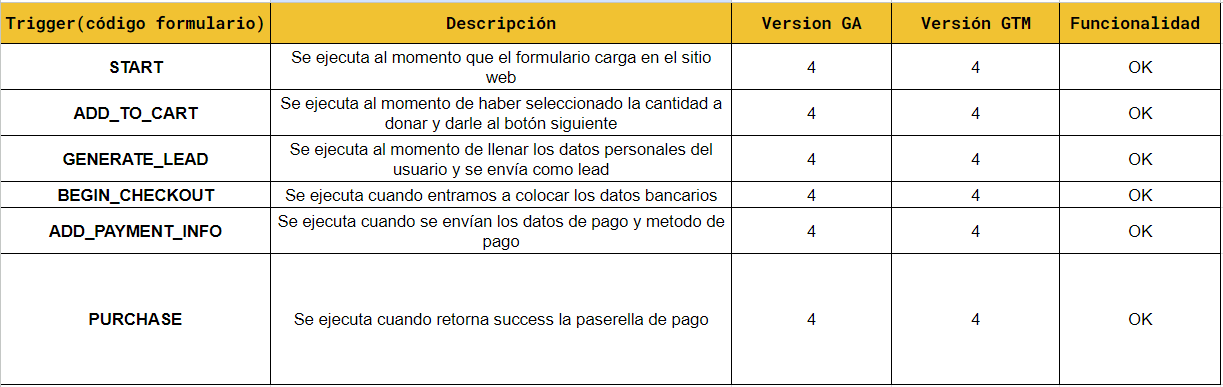
The events for each objective (Goal) of the widget are described, detailing their definition and when they are executed.
Goal: Donation
1- Event: “START”
Definition: Executed when rendering the Widget, indicating that the form has been displayed.
When to run: Immediately after the widget is completely rendered.
2- Event: “ADD_TO_CART”
Definition: Executed when selecting the amount and type of donation.
When it is executed: In the call to action of the payment data snippet.
3- Event: “GENERATE_LEAD”
Definition: It is executed when the user's personal data is filled out and is sent as a lead.
When it is executed: The event is executed immediately after completing the personal data and clicking the next step button.
4- Event: “BEGIN_CHECKOUT”
Definition: Indicates that the donation has begun its payment process.
When it is executed: Once the donor reaches the payment step.
5- Event: “ADD_PAYMENT_INFO”
Definition: Indicates that payment data was inserted.
When it is executed: Once the donor inserts the payment data and presses the submit button.
6- Event: “PURCHASE”
Definition: Indicates that the donation payment was processed satisfactorily.
When it is executed: Once the transaction response is received satisfactorily.
Goal: Registration
1- Event: “START”
Definition: Executed when rendering the Widget, indicating that the form has been displayed.
When to run: Immediately after the widget is completely rendered.
2- Event: “REGISTER”
Definition: Indicates that the lead has been registered.
When it is executed: When the person is registered in the database.

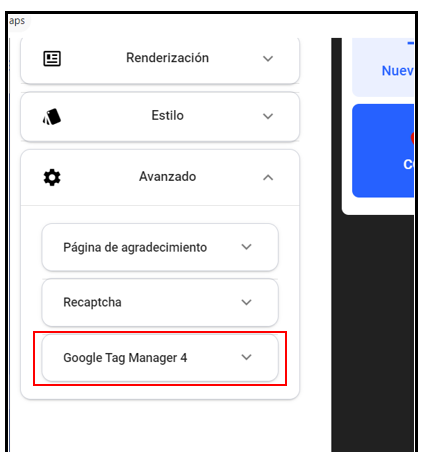
How is it activated in afrus?
- You must go to your widget > Advanced > click on Google Tag Manager 4
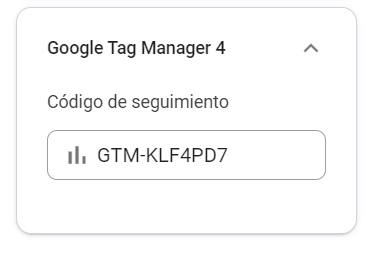
Enter the tracking code that you have previously configured within GTM4
Watch the video tutorial on how to configure events for afrus widgets using GTM4